
By: PrintableKanjiEmblem
Times Read: 14,881
Likes: 0 Dislikes: 0
Topic: Linux
Pretty cool, you can now utilize Active Directory to manage Linux user accounts/logins. This article takes you thru the steps needed to get Linux Mint 20 to join Active Directory.
Install needed packages
There are quite a few, but they are all needed to work together as they each handle one part of communicating between Linux and Active Directory.
Open a Bash prompt and enter the following:
sudo apt install realmd sssd sssd-tools libnss-sss libpam-sss krb5-user adcli samba-common-bin oddjob oddjob-mkhomedir packagekit samba python-dnspython
When all that gets installed, you will need to restart your Mint Linux machine.
Edit krb5.conf
After your machine is restarted, you will need to edit the krb5.conf file to make it so Kerberos knows how to talk to your Active Directory domain (Note that a Kerboros "realm" and an Active Directory "domain" mean the same thing):
sudo nano /etc/krb5.conf
Let say your Active Directory domain is myhouse.home, edit the krb5.conf file to resemble the following (Swapping myhouse.home for your domain name):
[libdefaults]
    default_realm = MYHOUSE.HOME
    dns_lookup_kdc = true
    dns_lookup_realm = true

[realms]
    MYHOUSE.HOME = {
        kdc = myhouse.home
        admin_server = myhouse.home
        master_kdc = myhouse.home
        default_domain = myhouse.home
    }

[domain_realm]
    .myhouse.home = MYHOUSE.HOME
    myhouse.home = MYHOUSE.HOME

[logging]
    kdc = SYSLOG:INFO
    admin_server = FILE=/var/kadm5.log
Next, we need to make sure authentication is reloaded so it's aware of the new values:
sudo pam-auth-update
Edit realmd.conf
Now we need to edit realmd.conf to tell it a bit more about MYHOUSE.HOME
sudo nano /etc/realmd.conf
[users]
    default-home = /home/%U
    default-shell = /bin/bash

[active-directory]
    default-client = sssd
    os-name = Linux Mint
    os-version = 20

[service]
    automatic-install = no

[myhouse.home]
    fully-qualified-names = yes
    automatic-id-mapping = no
    user-principal = yes
    manage-system = yes
Time Synchronization
We also need to set our time synchronization to use an Active Directory server for it's time source. A lot of things you do with Active Directory (encryption, etc) are very time-dependent, so you want all computers to use the same time source on your domain. Your Active Directory domain controllers should already be set up to get their time from public NTP (Network Time Protocol) servers, which are synchronized with official atomic clocks. You will need to know the name of at least one Active Directory domain controller in your domain, for example sake we're going to go with dc.myhouse.home:
sudo nano /etc/systemd/timesyncd.conf
In that file, find the [Time] section and set NTP to dc.myhouse.home:
[Time]
NTP=dc.myhouse.home
After saving that file, run the following Bash commands:
sudo timedatectl set-ntp true
sudo systemctl restart systemd-timesyncd.service
sudo timedatectl --adjust-system-clock
timedatectl status
Discovery
OK, we're getting a lot closer. Next step is t/o "discover" the Active Directory domain that you are going to be joining:
In bash, run this:
realm discover myhouse.home
If all goes well there, you should see some basic info about the myhouse.home domain and no error messages.
Make sure your Active Directory credentials can be used
Let's do a quick test and make sure that your Active Directory user account works now. For example, we are going with a user account myaccount@myhouse.home. So we are going to make sure that the 'myaccount' account is working from Linux.
kinit myaccount
klist
kdestroy
Join Active Directory Domain
Next step is to actually join the Active Directory domain:
sudo realm join --verbose --myaccount --computer-ou=OU=Computers,OU="MyHouse",DC=myhouse,DC=com myhouse.home
Edit sssd.conf
Almost done! Now edit sssd.conf:
sudo nano /etc/sssd/sssd.conf
Modify the file to look like this (Note that 'dyndns' on the bottom 5 lines are for setting DNS dynamically and has nothing to do with the well-known service dyndns.com, I had to verify that myself. They are needed even if not using dyndns.com services.):
[sssd]
domains = myhouse.home
config_file_version = 2
services = nss, pam

[domain/myhouse.home]
ad_domain = myhouse.home
krb5_realm = MYHOUSE.HOME
realmd_tags = manages-system joined-with-adcli
cache_credentials = True
id_provider = ad
krb5_store_password_if_offline = True
default_shell = /bin/bash
ldap_id_mapping = True
use_fully_qualified_names = True
fallback_homedir = /home/%u
access_provider = ad
ad_hostname = [[computer_name.my-domain]].com
dyndns_update = True
dyndns_refresh_interval = 43200
dyndns_update_ptr = True
dyndns_ttl = 3600
dyndns_auth = GSS-TSIG
Save that, then run this:
sudo systemctl restart sssd.service
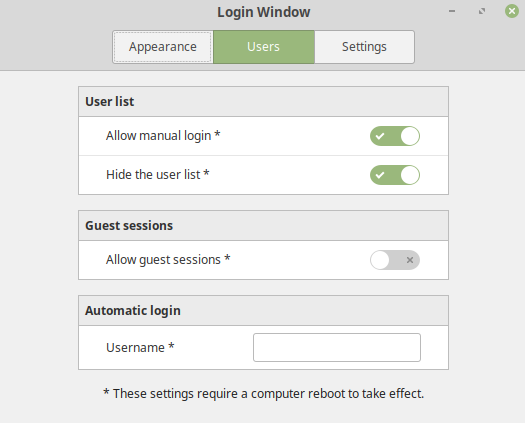
Linux Mint Login Window Settings
Finally, we need to make a change to Linux Mint's "Login Window" settings. Click on Mint's start button, then type 'login' and pick "Login Window" from the search results.
In the "Users" tab, make sure "Allow manual login" and "Hide the user list" are selected (active). And make sure "Allow guest sessions" is UN-selected:
Finally!
That should be everything, reboot your Linux Mint machine, and when it come up you will be able to log into your Linux Mint machine using an Active Directory user account!
Just In Case
If you run into an issue where you can log in, but cannot do anything, give your Active Directory user account explicit permissions as follows:
sudo usermod -a -G admmyaccount@myhouse.homesudo usermod -a -G cdrommyaccount@myhouse.homesudo usermod -a -G dipmyaccount@myhouse.homesudo usermod -a -G lpadminmyaccount@myhouse.homesudo usermod -a -G plugdevmyaccount@myhouse.homesudo usermod -a -G sambasharemyaccount@myhouse.homesudo usermod -a -G sudomyaccount@myhouse.home
Enjoy!
By:
Times Read: 377
Likes: 0 Dislikes: 0
Topic: Linux
Hi all,
This document helped a lot with joining my Mint to Windows Active Directory.
I can see my Mint object in Active Directory.
However - when trying to login with domain user it fails with an error “invalid password, please try again”.
Anyone knows if something is still missing?
all previous steps of this document worked perfectly.
Thanks!!